Difference between revisions of "Calibration of the Ergometer"
(→Zero Offset) |
|||
| (28 intermediate revisions by 4 users not shown) | |||
| Line 1: | Line 1: | ||
| − | |||
| − | |||
| − | |||
| − | |||
| − | |||
| − | |||
In order to get precise test data, it is absolute necessary that the SRM – High Performance Ergometer is calibrated. We recommend conducting this calibration before every measurement. | In order to get precise test data, it is absolute necessary that the SRM – High Performance Ergometer is calibrated. We recommend conducting this calibration before every measurement. | ||
<gallery> | <gallery> | ||
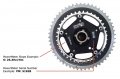
File:02-Steigung-u.-Seriennummer.jpg|Reading slope and serial number | File:02-Steigung-u.-Seriennummer.jpg|Reading slope and serial number | ||
| − | File:01- | + | File:01-Slope-Sign-frontview.jpg|Reading slope at the front |
| − | File: | + | File:02-Slope-Sign-Handlebar.JPG|Reading slope on the handlebar |
| − | File: | + | File:03-Slope-Sign-Crank.JPG|Reading slope at the crank |
| − | File: | + | File:Settings SRM Ergometer Software - Ergometer.png|Ergometer Settings |
| − | + | ||
</gallery> | </gallery> | ||
== PowerMeter Slope == | == PowerMeter Slope == | ||
| − | + | The slope in the ergometer software must be correspond to the slope of the PowerMeter and the PowerControl. | |
| + | We recommend to verify and control the slope of the PowerMeter before every test day. You can find the correct PowerMeter slope on small labels located-at | ||
| + | :*the rear of the PowerMeter, | ||
| + | :*the front of the ergometer, | ||
| + | :*the right crankarm, | ||
| + | :*the handlebar. | ||
| − | |||
| − | |||
| − | |||
<gallery> | <gallery> | ||
| Line 31: | Line 26: | ||
</gallery> | </gallery> | ||
| − | == | + | == Zero Offset == |
| − | [[File: | + | [[File:PC Ergometer 1.jpg|thumb|PC Ergometer]] |
| + | [[File:Settings SRM Ergometer Software - Ergometer.png|thumb|Ergometer Settings]] | ||
| − | The | + | The PowerMeter delivers a certain frequency which is proportional to the torque of the pedal force on the crank. If there is no load on the crank, the PowerMeter is sending a base frequency which must be communicated to the ergometer software and to the PowerControl as a reference value. This procedure is called zero offset calibration (offset adjustment). |
| + | The zero offset calibration has to be done before every new assembly of the PowerMeter and also before every measurement resp. every training on the Ergometer. A wrong zero offset calibration can result in an internal miscalculation of the power. | ||
| + | Please perform the zero offset calibration as it is described below: | ||
| + | :*For a manual comparison, please turn the right unloaded crank clockwise to activate the PowerMeter. | ||
| + | :*By simultaneously pressing MODE and SET, the PowerControl turns into calibration mode. | ||
| + | :*Wait a few seconds until the value on the right-hand side of the display stabilized itself. | ||
| + | :*Press SET to apply the zero offset. | ||
| + | :*The number on the right-hand side of the display is the current frequency of the PowerMeter (SET). | ||
| + | :*The number on the left-hand side of the display is the frequency which is used for the power measurement. | ||
| + | :*By pressing the [[Calibration of the Ergometer#Read Settings|'''Read Settings''']] button in the software, the zero offset will be displayed in the white background field. | ||
| + | :*Press the [[Calibration of the Ergometer#Write Settings|'''Write Settings''']] button, so that the zero offset will be saved in the software. | ||
| + | See also: [[SRM-Online represented practically#Zero offset calibration of the PC Ergometer|Zero offset calibration of the PowerControl Ergometer]] | ||
| + | == Circumference == | ||
| + | The circumference only influence the displayed speed and is not important for the calculation of the data. We recommend to insert a value of 1.000 mm. | ||
| + | The following points show the current state of the ergometer. They are important for the identification and the service. | ||
| + | == Firmware == | ||
| + | [[File:Firmware.png|thumb]] | ||
| + | The firmware can be updated if you drop the latest “SRM Firmware Image” file (*.sfi) in the box on the lower left corner of the screen: Drop file here to import. | ||
| + | The current firmware incl. date is displayed (e.g. V 1.1.5, 20.02.2017). | ||
| + | == Hardware == | ||
| + | Automatically adjusted! | ||
| − | + | == Product Code == | |
| − | + | Automatically adjusted! | |
| − | + | == Serial Number == | |
| − | + | Automatically adjusted! | |
| − | + | == Operation time == | |
| − | + | ||
| − | + | ||
| − | + | ||
| − | + | ||
| − | + | ||
| − | + | ||
| − | + | ||
| − | + | ||
| − | == | + | |
| − | + | ||
| − | + | ||
| − | + | ||
| − | + | ||
| − | + | ||
| − | + | ||
| − | + | ||
| − | + | ||
| − | + | ||
| − | + | ||
| − | + | ||
| − | + | ||
| − | + | ||
| − | + | ||
| − | + | ||
| − | + | ||
| − | + | ||
| − | + | ||
| − | + | ||
| − | + | ||
| − | + | ||
| − | + | ||
| − | + | ||
| − | + | ||
| − | + | ||
| − | + | ||
| − | + | ||
| − | + | ||
| − | + | ||
| − | + | ||
| − | + | ||
| − | + | ||
| − | + | ||
| − | + | ||
| − | + | ||
| − | + | ||
| − | + | ||
| − | + | ||
| − | + | ||
| − | + | ||
| − | + | ||
| − | + | ||
| − | + | ||
| − | + | ||
| − | + | ||
| − | + | ||
| − | + | ||
| − | + | ||
| − | + | ||
| − | + | ||
| − | + | ||
| − | + | ||
| − | + | ||
| − | + | ||
| − | + | ||
| − | + | ||
| − | + | ||
| − | + | ||
| − | + | ||
| − | + | ||
| − | + | ||
| − | + | ||
| − | + | ||
| − | + | ||
| − | + | ||
| − | + | ||
| − | + | ||
| − | + | ||
| − | + | ||
| − | + | ||
| − | + | ||
| − | + | ||
| − | + | ||
| − | + | Automatically adjusted! | |
| − | + | ||
| − | + | ||
| − | + | ||
| − | + | ||
| − | + | ||
| + | == Read Settings == | ||
| + | Read the current settings of the ergometer incl. the zero offset and the Slope. | ||
| + | == Write Settings == | ||
| + | Here it is possible to insert the slope and to save/to write it for the correct data. Please note that the must be correspond to the slope of the PowerMeter. | ||
| − | [[ | + | For a more detailed overview of the settings see [[Ergometer Software Installation and Settings| Settings]] |
Latest revision as of 19:32, 2 February 2018
In order to get precise test data, it is absolute necessary that the SRM – High Performance Ergometer is calibrated. We recommend conducting this calibration before every measurement.
Reading slope and serial number
Reading slope at the front
Reading slope on the handlebar

Reading slope at the crank

Ergometer Settings


Contents
PowerMeter Slope
The slope in the ergometer software must be correspond to the slope of the PowerMeter and the PowerControl. We recommend to verify and control the slope of the PowerMeter before every test day. You can find the correct PowerMeter slope on small labels located-at
- the rear of the PowerMeter,
- the front of the ergometer,
- the right crankarm,
- the handlebar.
Reading slope and serial number
Reading slope at the front
Reading slope on the handlebar
Reading slope at the crank
Zero Offset

The PowerMeter delivers a certain frequency which is proportional to the torque of the pedal force on the crank. If there is no load on the crank, the PowerMeter is sending a base frequency which must be communicated to the ergometer software and to the PowerControl as a reference value. This procedure is called zero offset calibration (offset adjustment).
The zero offset calibration has to be done before every new assembly of the PowerMeter and also before every measurement resp. every training on the Ergometer. A wrong zero offset calibration can result in an internal miscalculation of the power.
Please perform the zero offset calibration as it is described below:
- For a manual comparison, please turn the right unloaded crank clockwise to activate the PowerMeter.
- By simultaneously pressing MODE and SET, the PowerControl turns into calibration mode.
- Wait a few seconds until the value on the right-hand side of the display stabilized itself.
- Press SET to apply the zero offset.
- The number on the right-hand side of the display is the current frequency of the PowerMeter (SET).
- The number on the left-hand side of the display is the frequency which is used for the power measurement.
- By pressing the Read Settings button in the software, the zero offset will be displayed in the white background field.
- Press the Write Settings button, so that the zero offset will be saved in the software.
See also: Zero offset calibration of the PowerControl Ergometer
Circumference
The circumference only influence the displayed speed and is not important for the calculation of the data. We recommend to insert a value of 1.000 mm.
The following points show the current state of the ergometer. They are important for the identification and the service.
Firmware

The firmware can be updated if you drop the latest “SRM Firmware Image” file (*.sfi) in the box on the lower left corner of the screen: Drop file here to import. The current firmware incl. date is displayed (e.g. V 1.1.5, 20.02.2017).
Hardware
Automatically adjusted!
Product Code
Automatically adjusted!
Serial Number
Automatically adjusted!
Operation time
Automatically adjusted!
Read Settings
Read the current settings of the ergometer incl. the zero offset and the Slope.
Write Settings
Here it is possible to insert the slope and to save/to write it for the correct data. Please note that the must be correspond to the slope of the PowerMeter.
For a more detailed overview of the settings see Settings